


This is the second article in a series where we create a Wordle clone in Remix! 💿 We go step by step, from setting up the application to creating pages and implementing game logic. In this article, we will discuss how Remix handles routing. Next, we will create all the routes needed for our game and prepare the views. Let's get started!
What is a route?
Routing is one of the core concepts in Remix. You can think of it as the answer to the following question.
What code runs when the user hits a given URL?
This applies to the user interface, but also what code will be executed on the server or what resources will be served (such as dynamic CSS stylesheets).
Defining our routes
What we want to have in our application are the following routes:
/- home page with the header and a hero section with a link to the game/play- game page, also with the header and the game board/play/win- a pop-up modal that shows up when the user wins the game/play/loss- a pop-up modal that shows up when the user loses the game
It's worth noting, that on the browser side, routing in Remix is implemented using react-router. But contrary to regular front-end applications, you don't define your routes in the code, but by creating an appropriate folder structure. By default, each file in /app/routes creates a separate route module. Files are matched to URLs by their paths.
Remix supports nested routes as any URL can match multiple file paths. There are two ways we can create nested routes in Remix:
- creating a route file in a subfolder - that leads to creating a nested layout
- creating a file with
.in the name - that leads to creating a nested route without nesting the layout
For our application, what we need are nested layouts. This is the complete folder structure. 👇
├── routes
|   ├── play
|   |   ├── loss.tsx
|   |   └── win.tsx
│   ├── index.tsx
│   └── play.tsx
There is a lot more to route file conventions in Remix than what we need, such as index routes or nested URLs without nested layouts. You can read more on these topics here.
Route Module API
Once we've created the route files, let's discuss what we need to put in them. The convention for these files is called Route Module API and allows you to specify the following for a given route.
defaultexport - a function that should be a React component that the route will render.loadernamed export - function which, as the name suggests, is called on the server before rendering to provide the server data.actionnamed export - function that runs on the server allowing to handle mutations and other actions.linksandmetanamed exports - functions that can be used to set links and meta HTML tags (yes, you can do this per route 🥳).CatchBoundaryandErrorBoundarynamed exports - React components that will be rendered if an error is thrown on the server and in the browser route code respectively.
The full API is documented here, you can take a look. We will be using selected parts of this API as we need them.
Creating layouts
Let's now go page by page and create the views that we need!
Adding the header
First, we want to have the header on all pages. For that we can use root.tsx - the layout there will render on every route.
// app/root.tsx
import { Links, Outlet, Link } from "remix";
import { Logo } from "~/components/Logo";
...
export default function App() {
  return (
    <html lang="en">
      <head>
        ...
        <Links />
      </head>
      <body>
        <header className="flex justify-center border-b-2 border-gray-100 p-4">
          <Link to="/">
            <Logo size="md" />
          </Link>
        </header>
        <Outlet />
        ...
      </body>
    </html>
  );
}
You can get the implementation of the Logo component here. Link comes from remix and redirects to a given path on click - we want the user to be redirected to the homepage on logo click.
With that, you should see the following in the browser.
One important thing to notice here is the <Outlet /> component - this way we control where the nested route's layout appears within the current route.
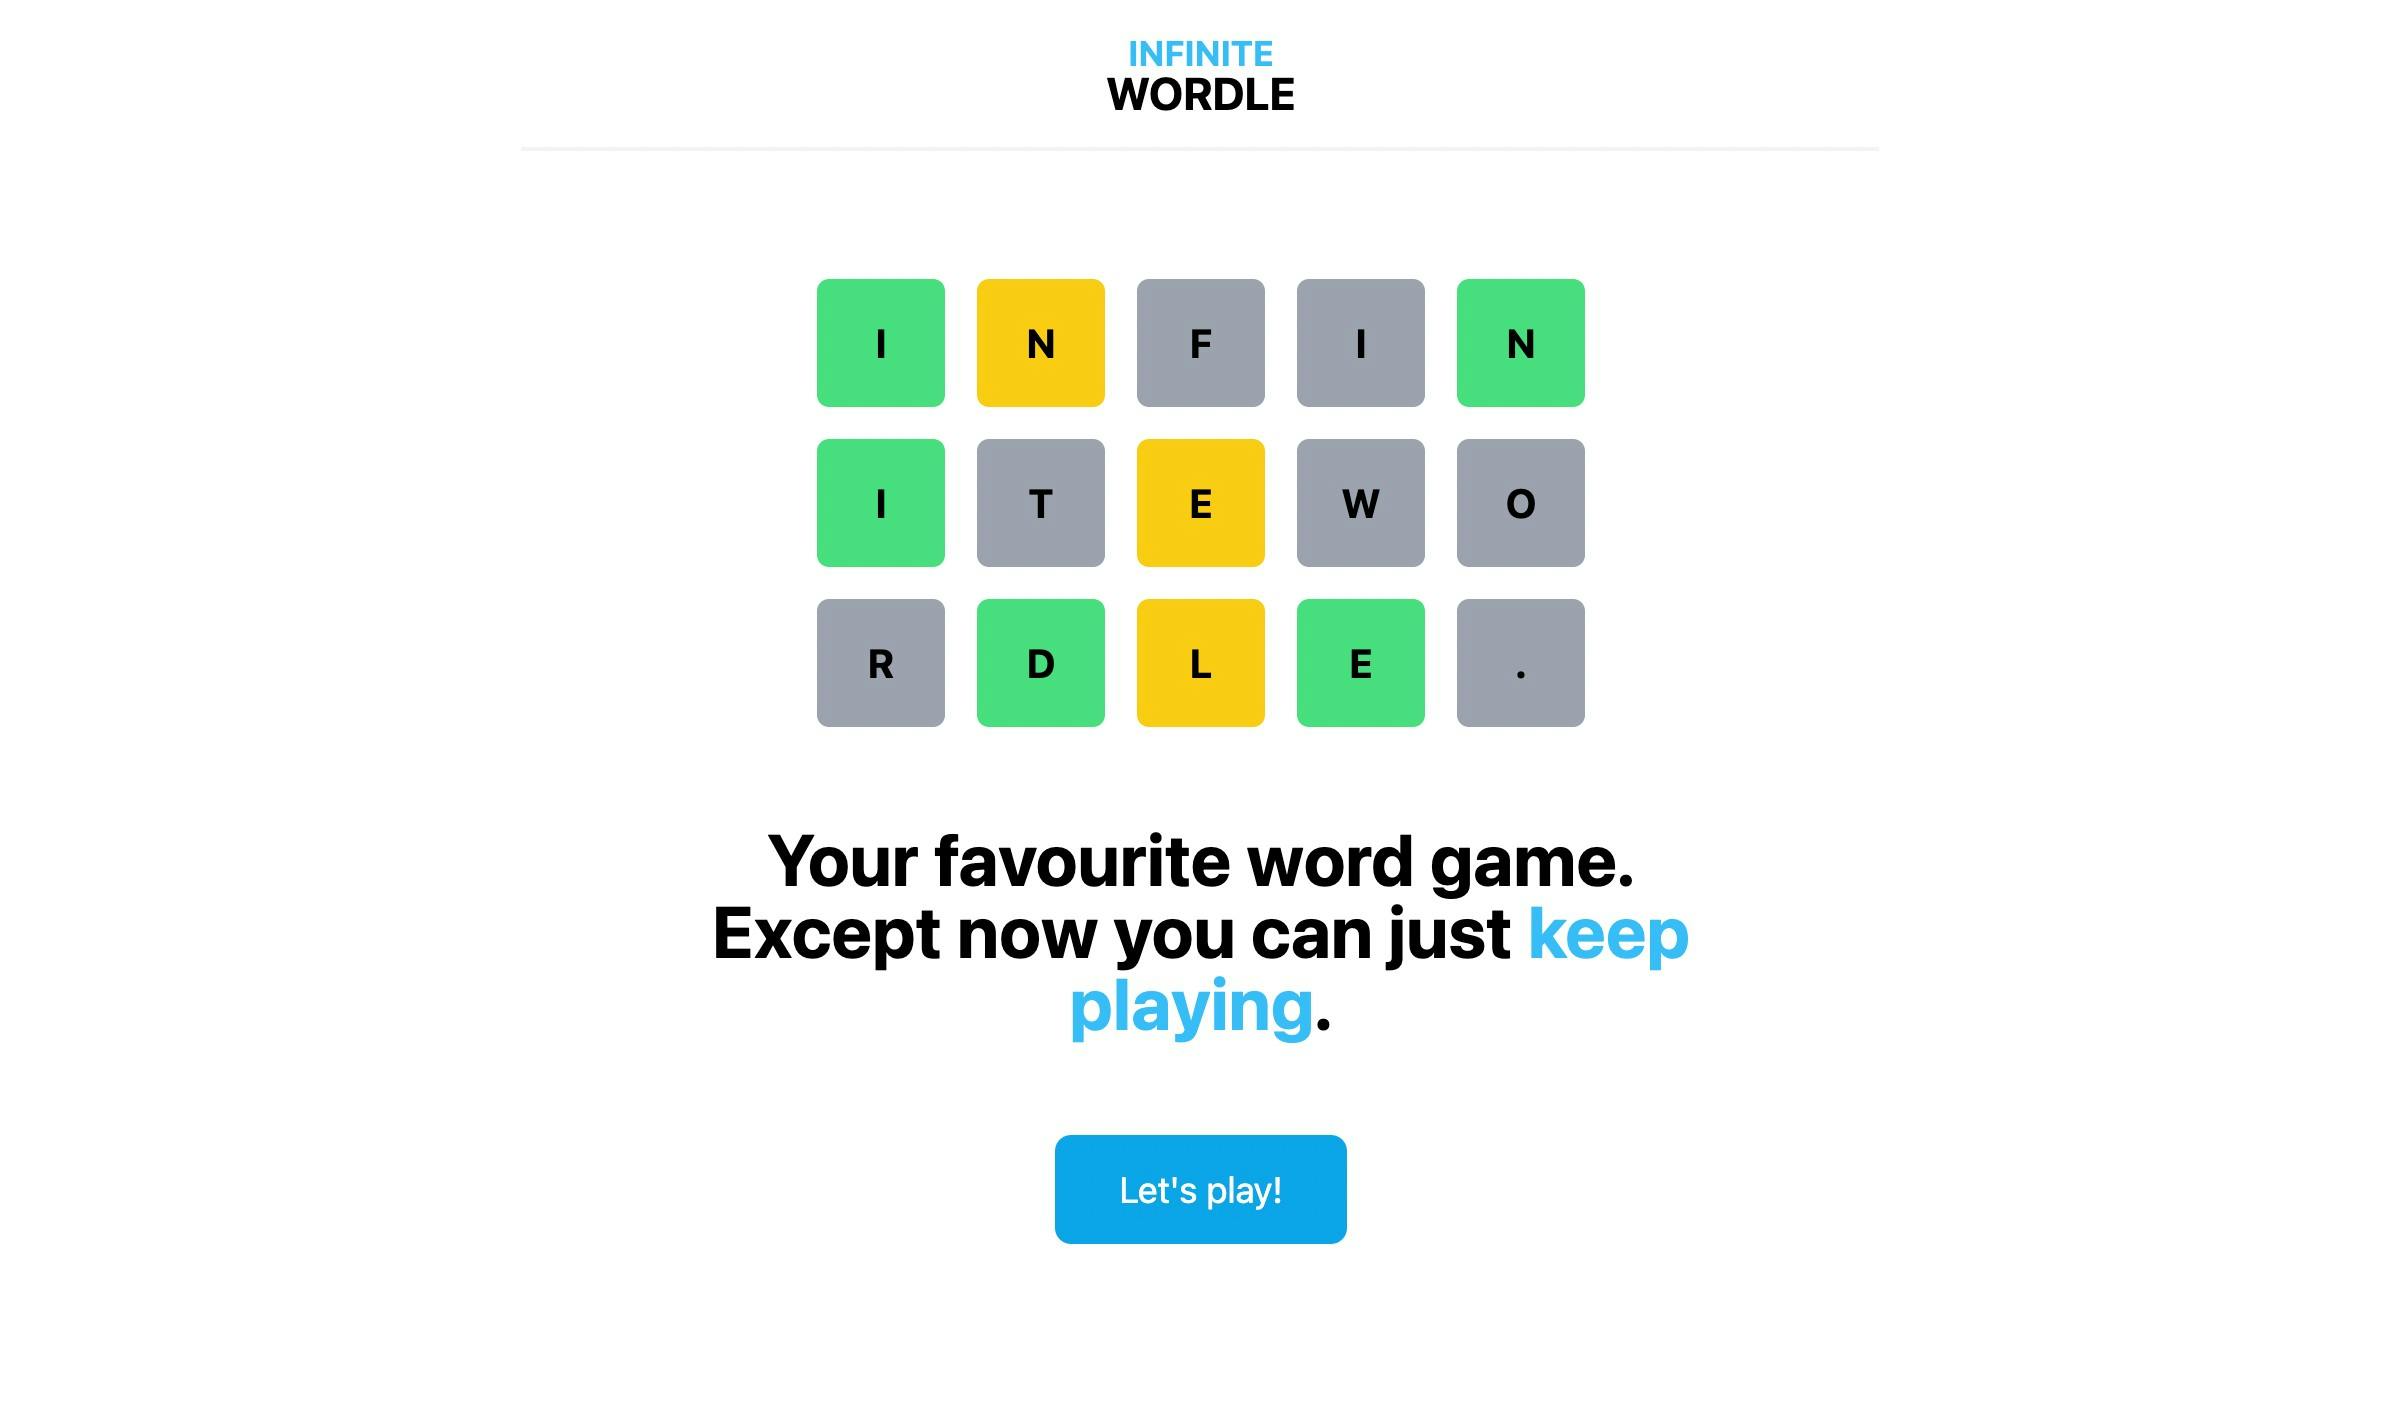
Homepage and the hero section
Next, let's move to the main index page. Here we want to have a hero section. We will replace what we currently have in routes/index.tsx.
// app/routes/index.tsx
import { Link } from "remix";
import { styles as buttonStyles } from "~/components/Button";
import { Illustration } from "~/components/Illustration";

export default function Index() {
  return (
    <main className="text-center flex justify-center">
      <div>
        <div className="mt-16 mb-12">
          <Illustration />
        </div>
        <p className="text-4xl font-bold leading-none mb-12 max-w-lg">
          Your favourite word game. Except now you can just{" "}
          <span className="text-sky-400">keep playing</span>.
        </p>
        <Link to="/play" className={buttonStyles({ size: "lg" })}>
          Let's play!
        </Link>
      </div>
    </main>
  );
}
Here we introduced a few more custom components - similarly, you can get Illustration and other components from this directory, we won't be going over the exact implementation.
One more thing we need for the components to work is adding a file for types. Let's create app/types.ts file with the following.
// app/types.ts
export type LetterStatus = "match" | "include" | "miss";
We will use this to represent a letter status used in Wordle to recognize whether a given letter on a given position:
- matches the position in the word to guess
- is included in the word but not in the correct position
- doesn't appear in the word
With all of that, we should have the following.
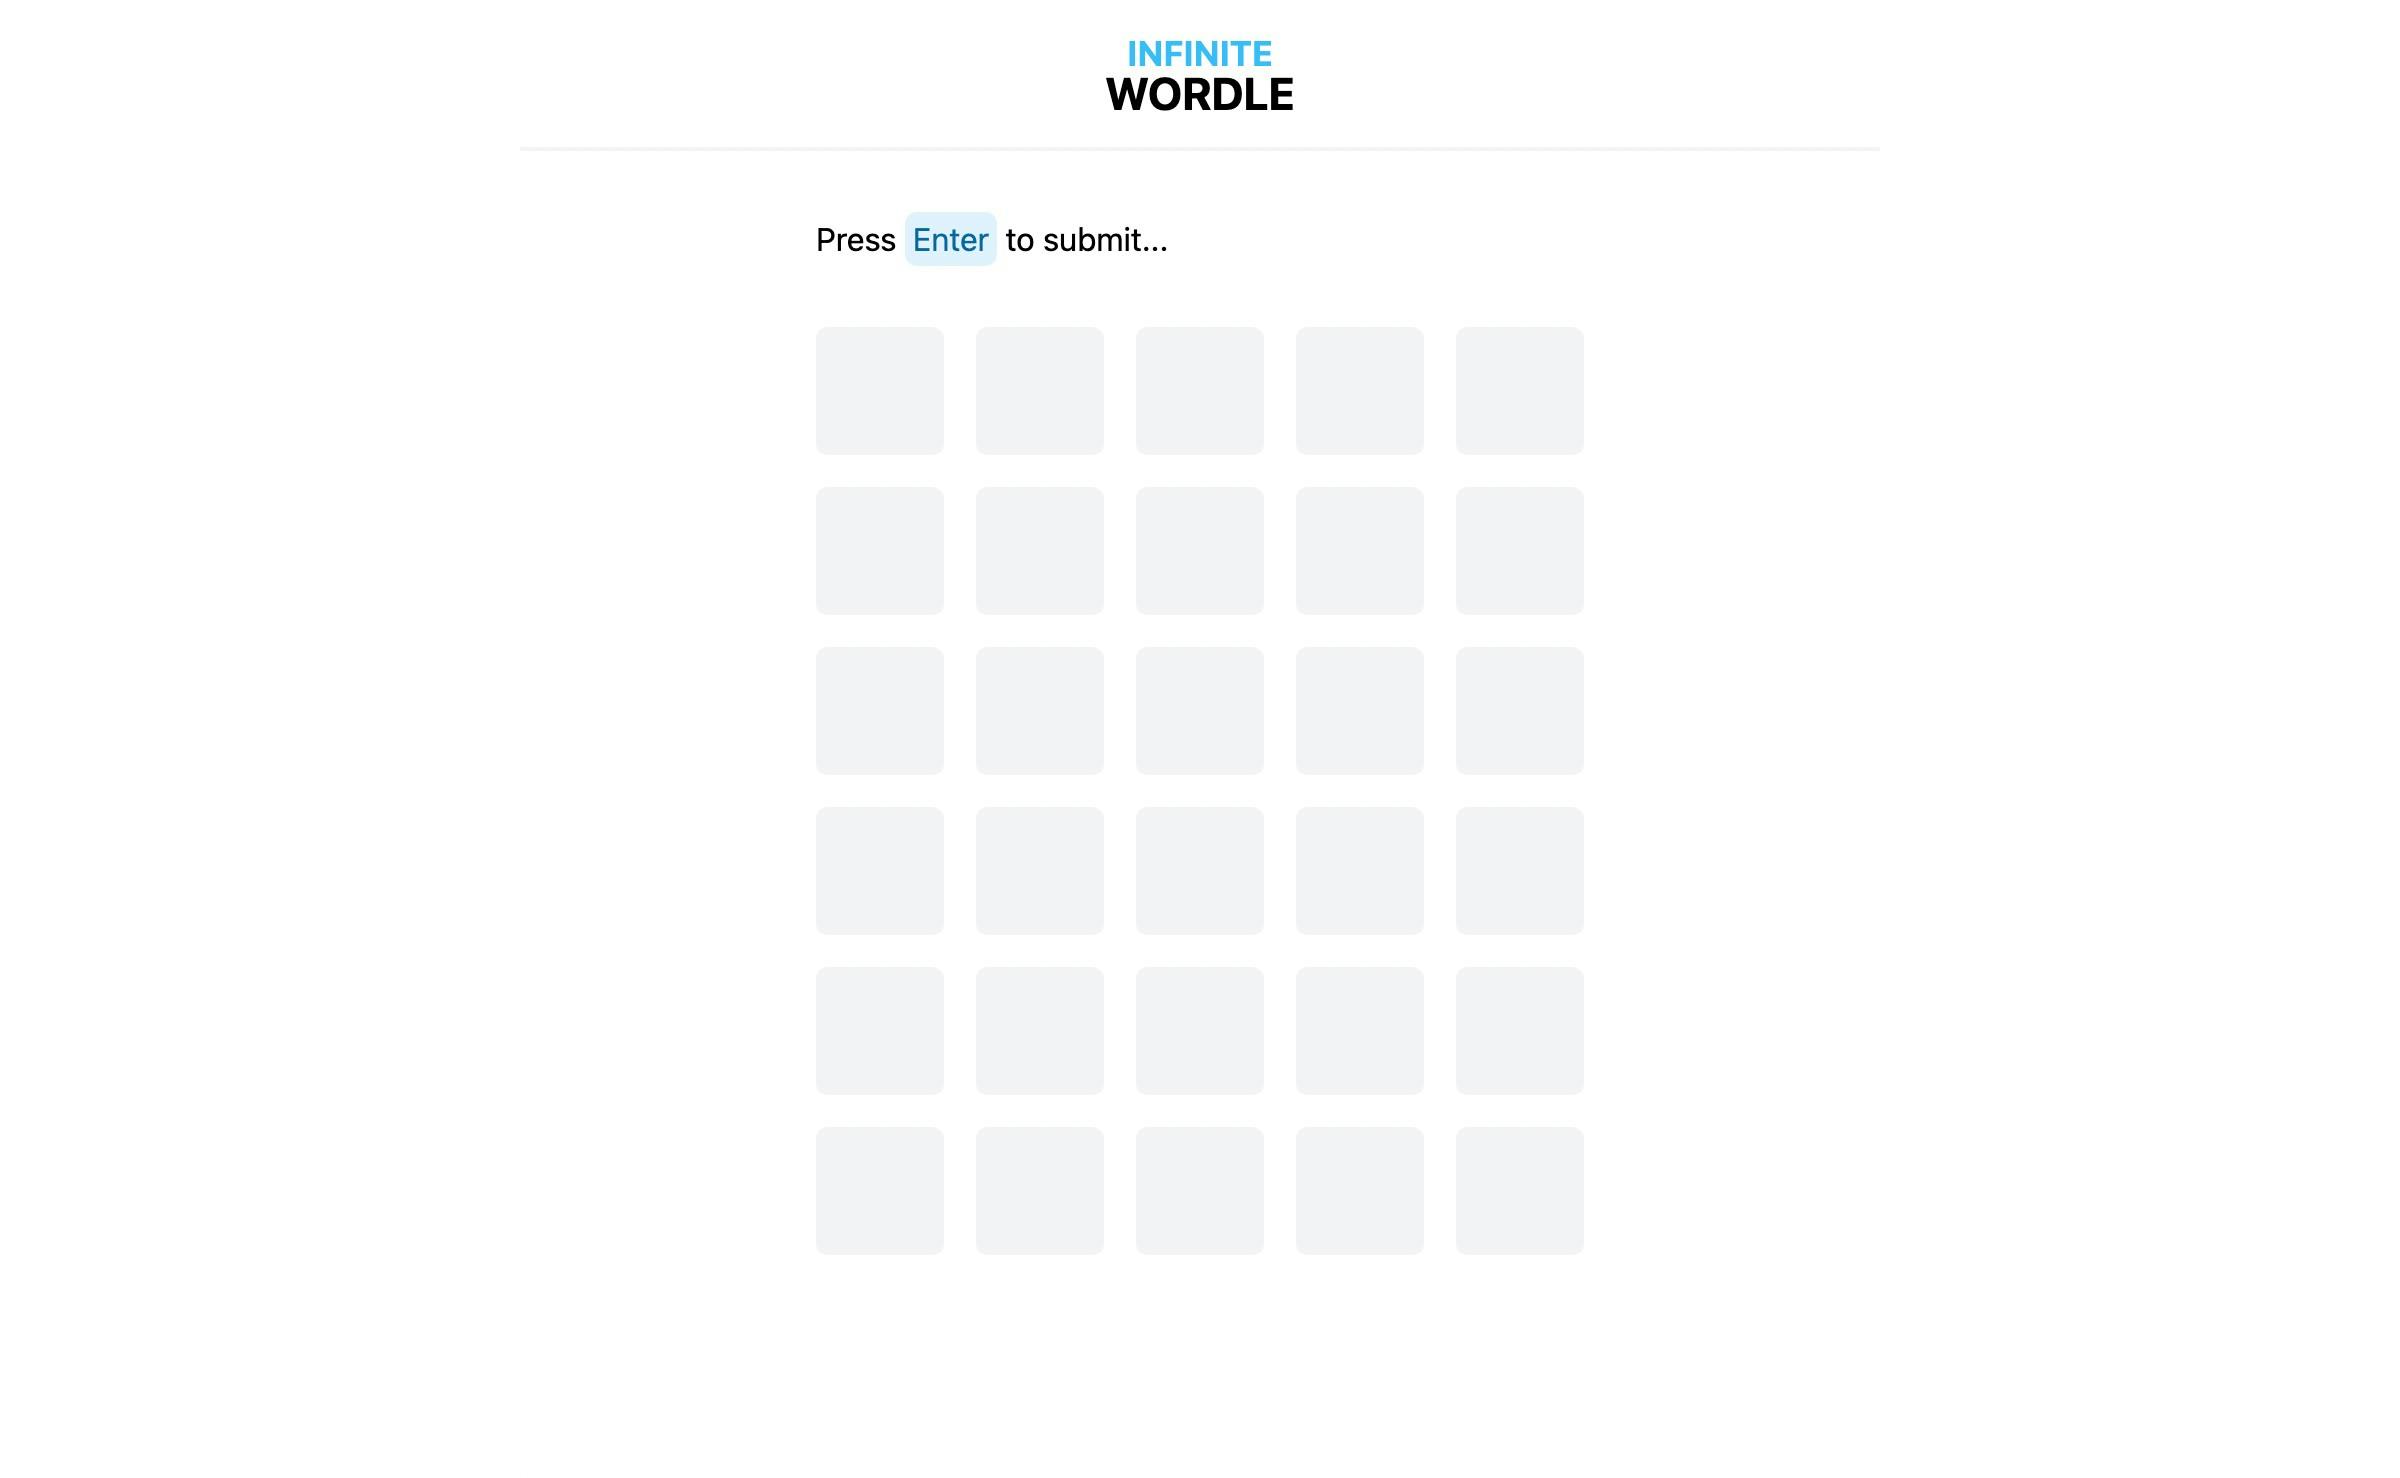
Game page
We want the game board to be displayed on /play route - let's go to routes/play.tsx to implement the view. We'll start by adding the default export first.
// app/routes/play.tsx
import { Outlet } from "remix";
import { Mark } from "~/components/Mark";
import type { LetterGuess } from "~/types";

export default function Play() {
  return (
    <main className="my-8 mx-4">
      <div className="flex justify-center">
        <div>
          <div className="mb-8">
            <span>
              Press <Mark>Enter</Mark> to submit...
            </span>
          </div>
        </div>
      </div>
      <Outlet />
    </main>
  );
}
Again, you can find Mark implementation here. As you see, we already placed the Outlet component for rendering /play/* nested routes, for win and loss pop-ups.
Let's render the game board, empty for now (populating with non-breaking spaces). I'll add an array that stores items that populate the grid.
// app/routes/play.tsx
...
import { Tile } from "~/components/Tile";
import { Grid } from "~/components/Grid";
import type { LetterGuess } from "~/types";

export default function Play() {
  const gridItems: LetterGuess[] = [
    ...new Array(30)
      .fill("\xa0") //
      .map((letter) => ({ letter })),
  ];

  return (
    <main className="my-8 mx-4">
      <div className="flex justify-center">
        <div>
          <div className="mb-8">
            ...
          </div>
          <Grid>
            {gridItems.map(({ letter, status }, index) => (
              <Tile key={index} status={status}>
                {letter.toUpperCase()}
              </Tile>
            ))}
          </Grid>
        </div>
      </div>
      <Outlet />
    </main>
  );
}
We need to add the missing type - each guess consists of a letter and optionally a status which we will later set after verifying the user's guess.
// app/types.ts
export type LetterStatus = "match" | "include" | "miss";
export type LetterGuess = { letter: string; status?: LetterStatus };
We should see the following in the browser. Sweet! 🎉
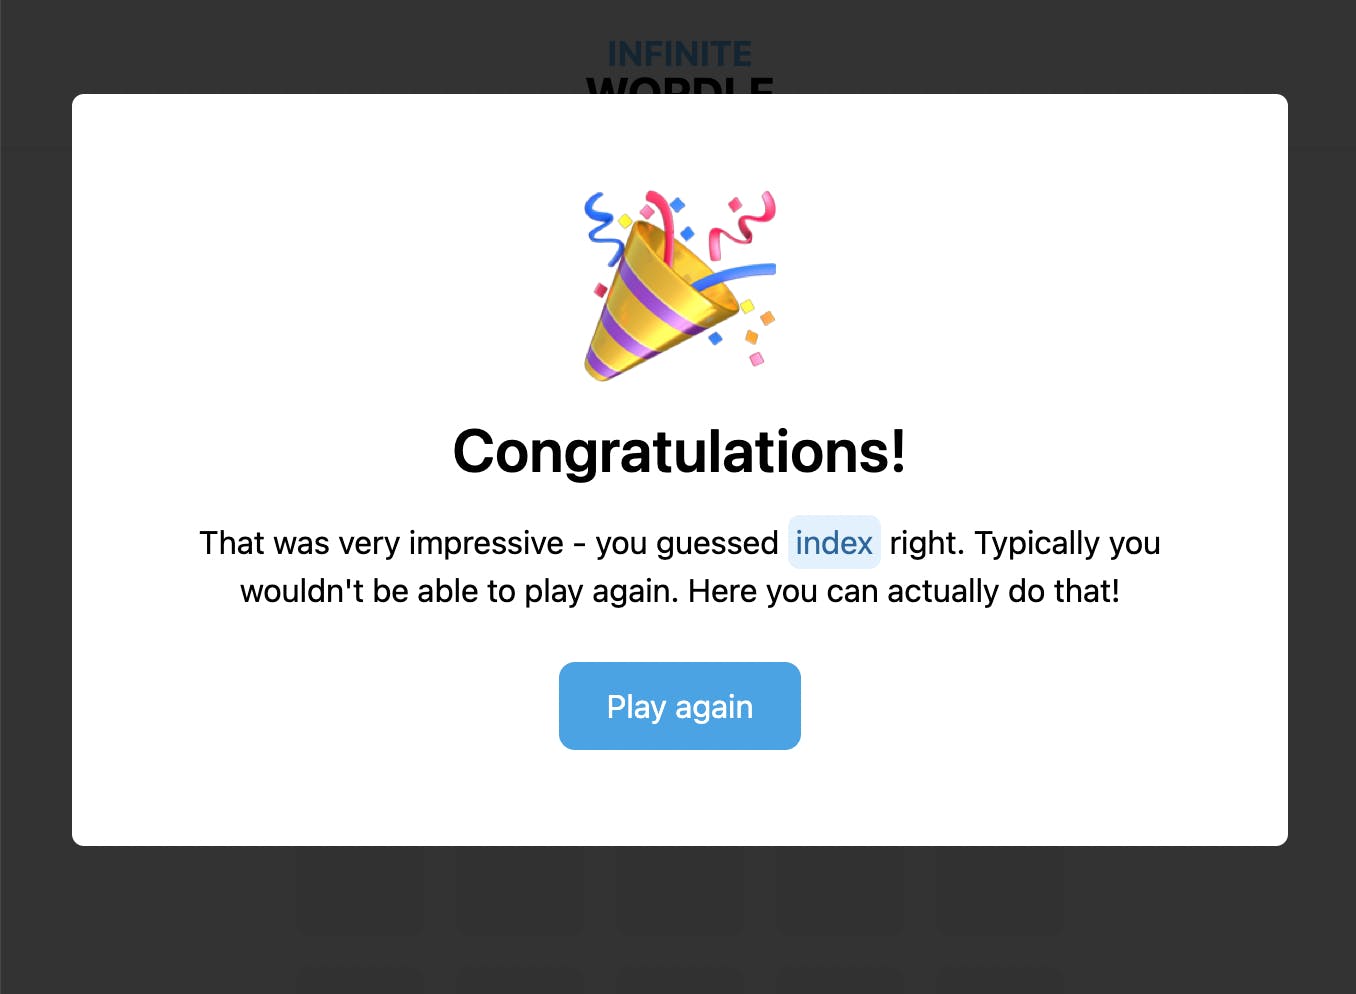
Next, we implement views for /play/win and /play/loss routes. On both of these pages, we want to display a pop-up (the play page should still be visible underneath).
Win page
Let's start with the happy path and put in the Dialog component (again, code available here) for when a user wins the game.
// app/routes/play/win.tsx
import { Dialog } from "~/components/Dialog";
import { Button } from "~/components/Button";
import { Mark } from "~/components/Mark";

export default function Win() {
  const word = "index";

  return (
    <Dialog onClose={() => {}}>
      <div className="text-center">
        <div className="text-8xl mb-4">🎉</div>
        <h2 className="text-3xl mb-4 font-semibold">Congratulations!</h2>
        <p className="max-w-lg mb-6">
          That was very impressive - you guessed <Mark>{word}</Mark> right.
          Typically you wouldn't be able to play again. Here you can actually do
          that!
        </p>
        <Button>Play again</Button>
      </div>
    </Dialog>
  );
}
For now, I've put in index as our word to guess - we will replace that with a proper value later on. There's also an empty function passed as onClose which we will handle in a minute.
Now, when you go to /play/win you get the pop-up opened over the board game. Awesome! 🙌
Closing the pop-up
When you look into the Dialog implementation you see that the onClose handler is called in two cases.
- When the user clicks outside of the pop-up.
- When the user presses the
Escapekey.
When that happens, we want to close the pop-up. But how do we do that? 🤔
We need to navigate back to /play - that's enough for Remix to see that /play/win route no longer matches, so the pop-up should not be rendered. Let's handle that with useNavigate from remix.
// app/routes/play/win.tsx
...
import { useNavigate } from "remix";
import { useCallback } from "react";

export default function Win() {
  const word = "index";
  const navigate = useNavigate();
  const onClose = useCallback(() => navigate("/play"), []);

  return (
    <Dialog onClose={onClose}>
      ...
    </Dialog>
  );
}
Now, when you click outside or hit escape, you should no longer see the pop-up!
Loss page
For a loss page, we want a very similar behavior - a pop-up with slightly different content, that also closes on the same conditions. You might want to go ahead and try to add one yourself before you read further! 👀
Here's what we need for the loss page.
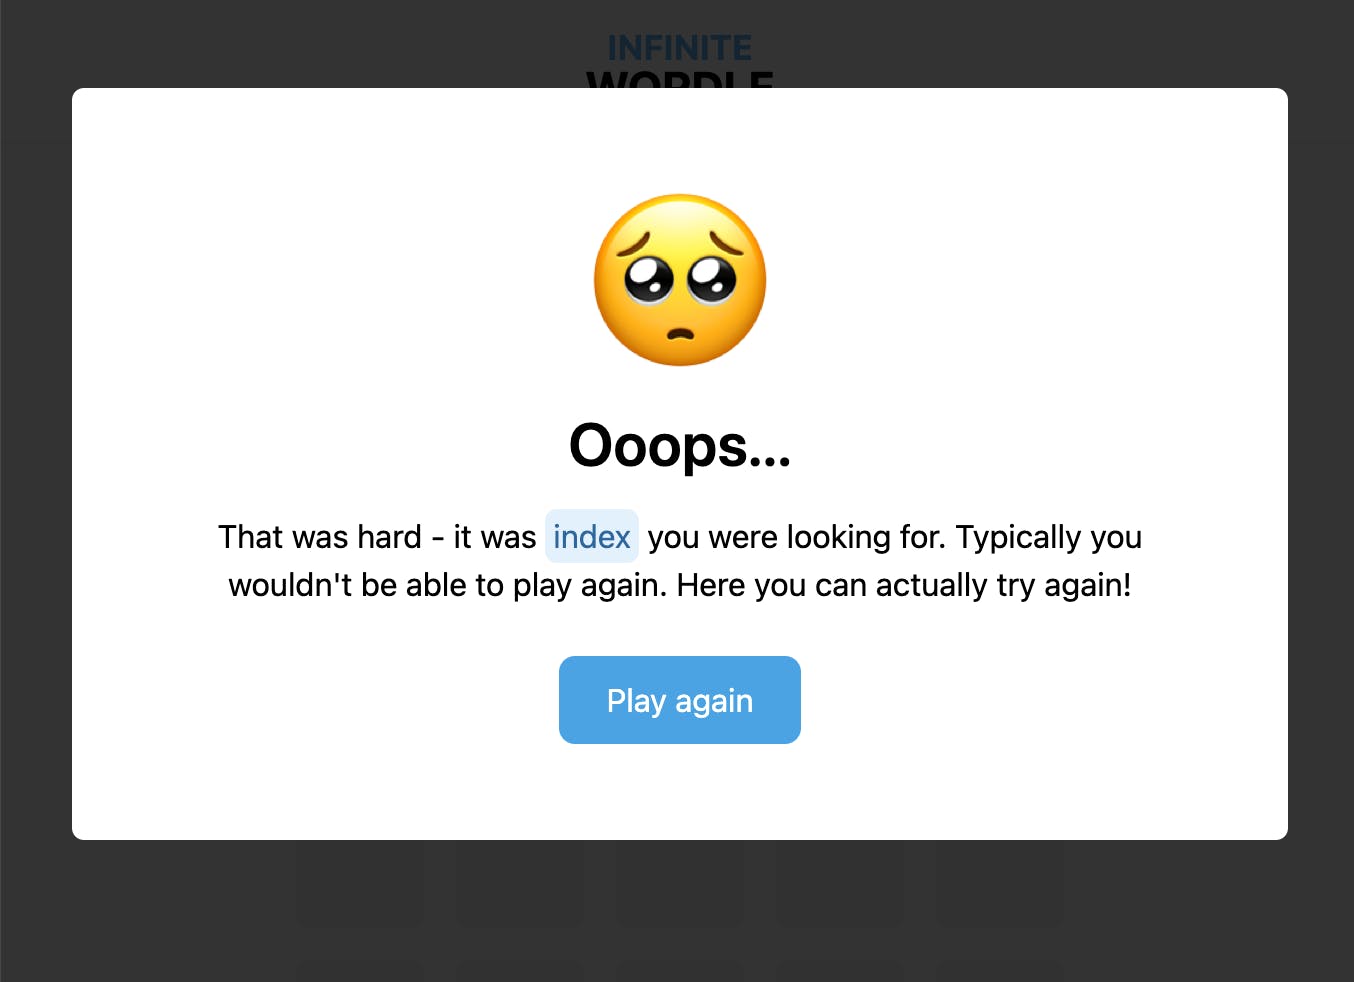
// app/routes/play/loss.tsx
import { Dialog } from "~/components/Dialog";
import { Button } from "~/components/Button";
import { Mark } from "~/components/Mark";
import { useNavigate } from "remix";
import { useCallback } from "react";

export default function Loss() {
  const word = "index";
  const navigate = useNavigate();
  const onClose = useCallback(() => navigate("/play"), []);

  return (
    <Dialog onClose={onClose}>
      <div className="text-center">
        <div className="text-8xl mb-4">🥺</div>
        <h2 className="text-3xl mb-4 font-semibold">Ooops...</h2>
        <p className="max-w-lg mb-6">
          That was hard - it was <Mark>{word}</Mark> you were looking for.
          Typically you wouldn't be able to play again. Here you can actually
          try again!
        </p>
        <Button>Play again</Button>
      </div>
    </Dialog>
  );
}
Similarly, I've put a temporary word, which we will replace later on. When you now navigate to /play/loss you should see the following.
Conclusion
Great, we've got all the views we need for our application! ✨ Here's a short summary of things we've gone through:
- discussed the concept of routing
- explored Route Module API from Remix
- created routes that we need in our project and prepared views
- implemented declarative navigation with the
Linkcomponent and programmatic navigation withuseNavigate
Next up, we will go over what will be the state of our game and how to store that information. See you! 👋
If you liked the article or you have a question, feel free to reach out to me on Twitter‚ or add a comment below!
Further reading and references
- Full code available in this repository
- Photo by Nacho Rochon on Unsplash
- Remix documentation